Everyone wants to look and feel fit, and stubborn belly fat can get in the way of that. Yoga is not only a useful tool for managing your weight, it can also support your efforts in losing belly fat when paired with healthy habits.
This article is for general information only and is not medical advice. Before starting any new exercise or yoga routine, especially if you are pregnant or have a health condition, please consult a qualified doctor or a certified yoga instructor.
Watch the video: yoga for belly fat (youtube.com/watch?v=MZu98VQvbXE)
Will Yoga Positions Help You Lose Belly Fat?
Stubborn belly fat can be frustrating. It helps to remember that no single move “burns” fat from one specific spot, so-called spot reduction is a myth. Fat loss happens across the whole body, and it depends mostly on an overall calorie balance.
For the best results, combine yoga with a healthy diet and regular exercise. Try to keep your meals free of heavily processed foods and junk food. Yoga can help you strengthen your core and abdominal muscles and may support a healthy, active metabolism as part of a balanced lifestyle.
[Read more about losing belly fat]
12 Yoga Positions That Can Help You Work Toward a Flatter Belly
1. Tadasana (Mountain Pose)
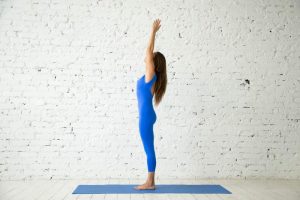
How to do it:
- Stand with your feet flat and heels slightly apart, but with your big toes touching.
- Place your hands at your sides with palms facing your body, keeping your spine upright.
- Bring your palms together as you stretch your hands.
- Inhale while stretching your spine. Fold your hands, raise them above your head, and stretch up as far as you comfortably can.
- Rise onto your toes with your eyes facing the ceiling. If standing on your toes is difficult, keep your feet flat on the floor and look up at the ceiling.
- Breathe normally and hold the pose for 25 to 30 seconds.
- Inhale and exhale as you gradually relax and bring your feet back flat on the floor.
- Repeat this pose 5 to 10 times.
Variations: You can hold your arms parallel and facing each other, stretch them upward, or position them perpendicular to the floor.
Benefits:
- Helps improve your overall posture.
- Engages the buttocks and abdominal muscles.
- Strengthens the ankles, knees, and thighs.
- May help relieve sciatica, the pain that affects the hips, back, and outer legs.
Caution:
- People with low blood pressure, headaches, or insomnia should avoid this pose.
2. Surya Namaskar (Sun Salutation)
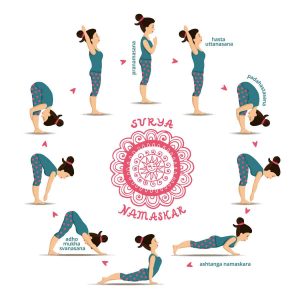
How to do it:
- Stand with your feet together, expanding your chest and relaxing your shoulders.
- Inhale and lift your arms out to the sides. As you exhale, bring your arms to your chest in a prayer position.
- Inhale while raising your hands and stretching them backward.
- Exhale and bend forward, reaching your forehead toward your knees.
- Bend your left knee and stretch your right leg backward, with your palms on the floor.
- Extend your left leg back and hold your breath in plank position.
- Keeping your spine still, lower toward the floor so your chest, knees, and chin touch down.
- Stretch forward while inhaling, then bend backward.
- Keep your hands firmly on the floor while exhaling and leaning forward.
- As you inhale, bring your right leg forward between your hands and rise up.
- Inhale deeply while bringing your left foot forward.
- Stretch back at the waist.
- Finally, return to your starting position.
Benefits:
- Works the whole body, from head to toe, including the internal organs.
- Helps keep you energized and feeling healthy.
Caution:
- Women should not perform it during menstruation or pregnancy.
- People with high blood pressure, spinal problems, or cardiovascular conditions should avoid this pose.
3. Padahastasana (Standing Forward Bend)
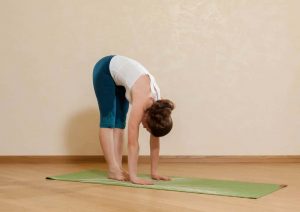
How to do it:
- Stand in the Tadasana pose, with your hands at your sides, feet resting together, and heels touching.
- Keep your spine erect.
- Inhale deeply while lifting your hands upward.
- Exhale while bending forward until your upper body is parallel to the floor.
- Continue to breathe as you fold all the way forward, moving your body away from your hips.
- Keep your palms straight and try to touch the floor without bending your knees.
- Beginners can start by touching their toes or ankles.
- Hold your breath, gently draw your tummy in, and hold this position for 70 to 90 seconds.
- Exhale and lift your body back into Tadasana pose, releasing your toes.
- Repeat this pose at least ten times, resting about 10 to 15 seconds between rounds.
Variations: Hold your toes while gripping only your shins or ankles, or place your hands under the balls of your feet.
Benefits:
- Helps tone the abdominal muscles, which can support better digestion.
- Helps strengthen the wrist joints.
- May help relieve physical and mental fatigue.
Caution:
- Master Uttanasana first, as it is less challenging, before practicing Padahastasana.
- People with spinal disc disorders should not perform this pose.
4. Paschimottanasana (Seated Forward Bend)
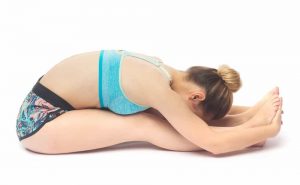
How to do it:
- Sit on the floor in Padmasana or Sukhasana pose.
- Keep your spine erect and your legs stretched out in front of you, with your feet pointing toward the ceiling.
- Inhale deeply and reach your hands over your head without bending your elbows. Stretch your spine as much as you can.
- Bend forward from your thighs and exhale. Lower your hands and reach for your toes, resting your head on your knees. Beginners can hold their legs or ankles.
- Once you reach your toes, hold them and gently pull back until you feel a stretch in your hamstrings.
- Breathe in while drawing your tummy in, and hold this position for 70 to 90 seconds at first.
- Exhale while raising your body and releasing your toes to return to the Padmasana or Sukhasana pose.
- Repeat this pose 5 to 10 times initially, and gradually increase to 25 to 30 times or more.
Variations: You can also stretch one leg at a time.
Benefits:
- Tones the abdominal muscles and may help relieve stress.
- May help support a more balanced menstrual cycle.
Caution:
- People with spinal disc disorders, those with diarrhea or asthma, and anyone who has recently had abdominal surgery should avoid this pose.
5. Pavanamuktasana (Wind-Relieving Pose)
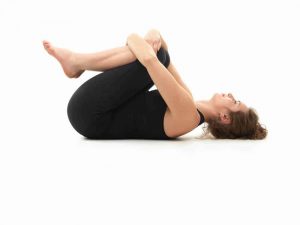
How to do it:
- Lie on your back with your arms at your sides and your legs stretched out, heels together.
- Bend your knees and exhale as you bring them toward your chest.
- Apply gentle pressure with your thighs on your abdomen.
- Place your hands under your thighs to hold your knees in position.
- Breathe deeply and hold this position for 70 to 90 seconds.
- Release your knees while exhaling and bring your hands back to your sides.
- Repeat this pose 5 to 6 times, resting 15 to 20 seconds between cycles.
Benefits:
- Helps tone the thighs, hips, and abdominal muscles.
- Gently massages the abdominal organs and may support digestion.
Caution:
- People with heart conditions, blood pressure issues, or spinal disc disorders, and women who are pregnant, should avoid this pose.
6. Naukasana (Boat Pose)
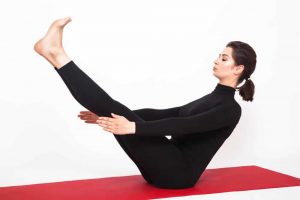
How to do it:
- Lie on your back with your arms at your sides and your legs stretched out together.
- Inhale and raise your legs, keeping them straight.
- Point your toes and lift your legs as high as you can without bending your knees, reaching your arms toward your toes so your body forms a 45-degree angle.
- Breathe normally and hold this pose for 15 to 20 seconds.
- Release and exhale. Repeat 5 to 6 times, resting 15 to 20 seconds between rounds.
Benefits:
- Strengthens the back and leg muscles.
- Strengthens the arms, thighs, and shoulders.
- Strengthens the core, which can support fat loss when combined with a healthy diet and exercise.
- May help support the health of the digestive organs.
Caution:
- People with heart conditions, diarrhea, blood pressure problems, insomnia, or headaches, as well as pregnant women, should avoid this pose.
7. Ushtrasana (Camel Pose)
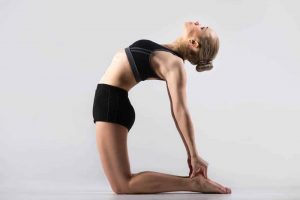
How to do it:
- Sit in Vajrasana pose.
- Slowly lift your body up onto your knees so that your weight rests on them.
- Keep your heels perpendicular to the ground.
- Exhale deeply and arch your back, placing your hands behind you to touch your ankles one at a time.
- Tilt your head back and continue stretching until you feel a stretch at your belly.
- Hold this pose for 25 to 30 seconds at first, building up to 60 to 70 seconds while breathing normally.
- Exhale, slowly relax, and return to Vajrasana pose.
- Repeat 5 to 10 times, resting 15 to 20 seconds in between.
Benefits:
- Improves posture while strengthening the back muscles.
- May help ease menstrual discomfort, fatigue, and back pain.
Caution:
- People with heart disease, back or neck injuries, high blood pressure, migraines, or insomnia should avoid this pose.
8. Uttanpadasana (Raised Foot Pose)
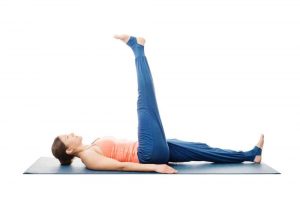
How to do it:
- Place a mat on the floor and lie on your back, legs stretched out with heels touching.
- Put your hands at your sides with your palms facing down.
- Inhale deeply and slowly exhale while tilting your head back to rest it on the floor.
- Keep your hands still in this position and breathe normally.
- Stretch as much as you can without straining your back.
- Inhale deeply and raise your legs to a 45-degree angle to the floor.
- Hold this position for 20 to 30 seconds while breathing normally.
- Exhale deeply and raise your legs to a 90-degree angle, holding for 20 to 30 seconds.
- Inhale deeply and bring your feet back to the starting (supine) position.
- Repeat 10 to 20 times, resting about 15 seconds after each round.
Benefits:
- May help ease digestive discomfort such as constipation and acidity.
- May help improve blood circulation and support the function of the reproductive organs.
Caution:
- People with a muscle strain or spinal injuries should avoid this pose.
9. Marjariasana (Cat-Cow Pose or Cat Pose)
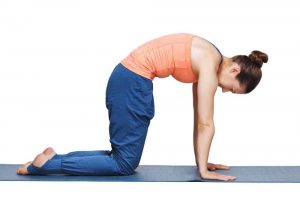
How to do it:
- Kneel on the floor and place your palms in front of you.
- Keep your knees slightly apart and your palms at shoulder width.
- Position your trunk parallel to the floor, with your thighs straight and vertical. Rest your feet and lower legs on the floor.
- Relax your shoulders, your back muscles, and your whole body.
- Exhale and pull your belly in, tucking your head between your shoulders while arching your back upward.
- As you inhale, move your back the other way, gently curving your spine downward.
- Repeat this process with slow, deep breathing.
Benefits:
- Helps improve posture and may relieve tension in your lower back.
Caution:
- People with a head injury should not perform this pose.
10. Bhujangasana (Cobra Pose)
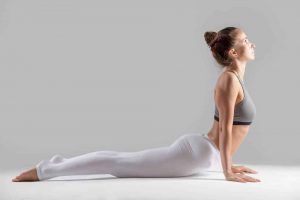
How to do it:
- Lie flat on your stomach with your hands beneath your shoulders and your legs stretched apart.
- Keep your toes and chin in contact with the floor.
- Slowly inhale and bend backward, raising your chest.
- Hold this position for 20 to 30 seconds, depending on your strength.
- Slowly exhale while returning your body to the starting position.
- Repeat 5 to 10 times, pausing 15 to 20 seconds between rounds.
Benefits:
- Strengthens the abdominal muscles, which can support fat loss as part of an overall routine.
- Builds a flexible, strong spine and helps strengthen the upper body.
Caution:
- People with a hernia or back or neck injuries, and pregnant women, should not perform this pose.
11. Dhanurasana (Bow Pose)
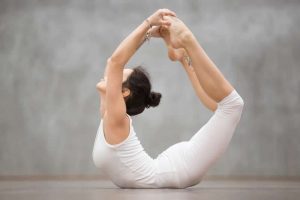
How to do it:
- Lie on your stomach with your arms at your sides and your legs stretched apart.
- Bend your knees and reach your arms back toward your feet or ankles, then hold them.
- Inhale while lifting your head, bending backward, and lifting your legs as high as you can.
- Hold this position for 20 to 30 seconds while breathing normally.
- Exhale and return to the starting position with your legs stretched and arms at your sides.
- Repeat 5 to 6 times, pausing 15 to 20 seconds in between.
Benefits:
- Tightens and strengthens your core and abdominal muscles.
- May help stimulate the digestive system and support regularity.
- May support digestion and energy levels as part of an active lifestyle.
Caution:
- People with a hernia or back or neck injuries, and pregnant women, should not perform this pose.
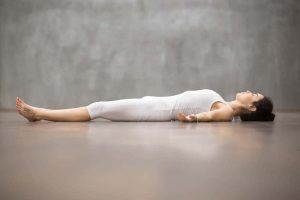
12. Shavasana (Corpse Pose)
How to do it:
- Lie in a supine position with your feet stretched out or together, whichever is more comfortable.
- Rest your hands at your sides.
- Keep your eyes closed.
- Inhale and exhale deeply, relaxing your body completely.
- Stay here, breathing naturally, until you reach a calm, peaceful state.
Benefits:
- May help reduce stress and promote relaxation, which can support better sleep and a calmer mind.
- Helps you reach a deeply restful, meditative state that supports recovery and stress relief.
Caution:
- People with discomfort or a back injury should avoid this pose. Pregnant women should also refrain from practicing it.
A Healthy Diet Plan Helps Improve Your Results
Yoga is a calming way to manage stress and support your weight goals without strain. Along with practicing these poses, focus on eating well so you can reach the results you want. Pair these two habits with good sleep, since poor rest can work against your efforts.
A few simple guidelines can help:
- Focus on fruits and vegetables.
- Cut back on added sugar.
- Try to finish dinner by around 6 to 7 pm.
- Make a few of these yoga poses part of your daily routine.
Remember that healthy, lasting changes take time, and yoga works best as one part of an overall active, balanced lifestyle.